오늘은 도커에 스프링 부트를 올려보겠습니다.
도커가 무엇인지는 다음 글에서 자세히 적어두었습니다. 링크를 참조해주세요.
Docker 이미지를 빌드하기 위한 지침을 포함하는 텍스트 파일입니다.
이 파일에 디펜던시를 명시해야 합니다.
ex) 자바 버전, 어플리케이션 종류, 도커 컨테이너 실행 명령어
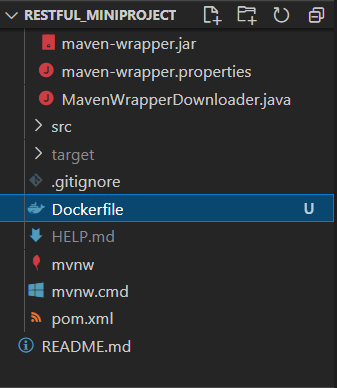
프로젝트 Root에 Dockerfile을 만듭니다.

Dockerfile의 내용은 참고 블로그를 참조해 다음처럼 작성하였습니다.
# Start with a base image containing Java runtime
FROM java:8

# Add Author info
LABEL maintainer="@gmail.com"

# Add a volume to /tmp
VOLUME /tmp

# Make port 8080 available to the world outside this container
EXPOSE 8080

# The application's jar file
ARG JAR_FILE=demo/target/*.jar

# Add the application's jar to the container
ADD ${JAR_FILE} restful_springboot.jar

# Run the jar file
ENTRYPOINT ["java","-Djava.security.egd=file:/dev/./urandom","-jar","/restful_springboot.jar"]
하나씩 짚어가면서 볼게요.
# Start with a base image containing Java runtime
FROM java:8
FROM 명령어를 통해 base image를 지정합니다. 한 마디로 이 SpringBoot 앱이 Java 8에서 실행된다는 의미입니다.
# Add Author info
LABEL maintainer="@gmail.com"
LABEL은 말그대로 명시를 위한 명령어 입니다.
Maintainer를 추가해 이 image를 관리하는 사람을 명시합니다.
# Add a volume to /tmp
VOLUME /tmp
이 VOLUME 명령어로 지정되는 디렉토리는 컨테이너가 필요한 여러가지 데이터를 저장하는 디렉토리입니다.
자세하게 설명하자면 VOLUME을 사용하여 호스트의 디렉토리를 Docker Container에 연결시킬 수 있습니다. 데이터, 소스코드, 외부 설정 파일 등등을 Dokcer Image에 commit하지 않고 Docker Container에서 사용할 수 있도록 합니다.
주로 로그 수집이나 Data 저장에 사용됩니다.
# Make port 8080 available to the world outside this container
EXPOSE 8080
EXPOSE 명령어를 통해 Docker Container 외부에 노출할 포트를 지정합니다.
제가 만든 웹 어플리케이션은 8080 포트를 가지고 실행될 것이기 때문에 위처럼 설정했습니다.
# The application's jar file
ARG JAR_FILE=demo/target/*.jar
docker build 커맨드로 Docker image를 빌드할 때 설정할 수 있는 옵션들을 지정해줍니다.
하나의 변수처럼 사용되며 민감한 정보(계정 암호 등)를 저장하는 것은 피해야 합니다. image에 그대로 남아있기 때문에 image가 노출되면 같이 노출될 우려가 있기 때문입니다.
저희는 JAR_FILE을 통해 어플리케이션의 실행파일(.jar)을 연결해줍니다. Mavne의 경우 /target 디렉토리에 저장되며 .jar 파일을 만드는 방식은 명령어를 입력하거나 vscode의 경우 Extension에 의해 사용 가능합니다.
# Add the application's jar to the container
ADD ${JAR_FILE} restful_springboot.jar
이제 위에서 설정한 JAR_FILE에 원하는 이름을 붙여 Docker image로 Copy합니다.
# Run the jar file
ENTRYPOINT ["java","-Djava.security.egd=file:/dev/./urandom","-jar","/restful_springboot.jar"]
Docker image가 실행될 때 실행되어야 할 기본 커맨드를 지정합니다. 필요한 Java 명령어를 스페이스를 기준으로 분리해 리스트 형태로 입력해줍니다.
작성한 Dockerfile으로 Docker image를 생성합니다.
우선 터미널에서 Dockerfile이 존재하는 디렉터리로 이동해주세요.
docker build -t restful_springboot .
위 명령어를 입력합니다. 본인이 설정한 jar 파일 명으로 입력해주세요.
만약 target 디렉토리에 jar 파일을 생성하는 부분을 넘겨 해당 디렉토리에 jar 파일이 존재하지 않을 경우 에러가 발생합니다.
PS C:\RESTful_MiniProject> docker build -t restful_springboot .
[+] Building 2.8s (7/7) FINISHED
=> [internal] load build definition from Dockerfile       0.1s
=> => transferring dockerfile: 553B                       0.0s
=> [internal] load .dockerignore                          0.1s
=> => transferring context: 2B                            0.0s
=> [internal] load metadata for docker.io/library/java:8  1.6s
=> [internal] load build context                          0.4s
=> => transferring context: 15.60kB                       0.3s
=> CACHED [1/2] FROM docker.io/library/java:8@sha256:c1f  0.0s
=> [2/2] ADD demo/target/*.jar restful_springboot.jar     0.2s
=> exporting to image                                     0.3s
=> => exporting layers                                    0.2s
=> => writing image sha256:d31cd73d5f29f50ce20a26bb5f0e6  0.0s
=> => naming to docker.io/library/restful_springboot      0.0s
저의 경우 위처럼 수행되었습니다.
도커 이미지가 제대로 만들어 졌는지 확인을 먼저 해봅시다.
간단하게 터미널에 docker images라고 입력하면 image들이 출력됩니다.
restful_springboot latest d31cd73d5f29 5 minutes ago 643MB
방금 전에 생성한 docker image가 잘 생성되었습니다.
docker run -p 5000:8080 restful_springboot
아까 Dockerfile에서 EXPOSE 통해 도커를 8080에 노출시켰습니다.
만약 이 웹 어플리케이션 말고 다른 웹 어플리케이션을 실행시킬 때 그 어플리케이션도 8080을 사용할 수 있습니다.
이때 같은 서버에서 같은 port를 사용하는 어플리케이션을 사용하면 중복에 의해 에러가 발생합니다.
이를 방지하기 위해 내 환경에서는 8080을 실행하고 도커에서는 다른 port를 실행할 수 있을까요?
이를 위해 사용하는 방법이 5000:8080입니다.
이 뜻은 내부적으로 이 어플리케이션이 8080을 사용하고 있으니 5000으로 날라오는 port는 이 어플리케이션의 8080으로 매핑하라는 뜻입니다.
이렇게 하면 개발 당시에는 8080을 사용하고, 도커에 올리고 난 후에는 5000 port를 이용할 수 있다는 장점이 있습니다.
http://localhost:5000/todo에 들어가 수행을 확인합니다.
F12번을 눌러 [네트워크] 탭에서 확인할 수 있습니다. 만약 아무것도 안 뜬다면 새로고침 해주세요.

잘 작동되고 있네요!
[Error] Docker Run 시에 발생한 오류에서 자세히 보실 수 있습니다.
docker run 단계에서 두 가지 오류가 발생했습니다.
첫 번째 오류는 Main을 못 찾는 오류로 pom.xml을 수정해 jar 파일 내에 manifest 파일을 수정해 Main class 정보를 저장해 수정했습니다.
오류 내용
no main manifest attribute, in /restful_springboot.jar
pom.xml에 추가한 내용
<build>
	<plugins>
		<plugin>
			<groupId>org.apache.maven.plugins</groupId>
			<artifactId>maven-jar-plugin</artifactId>
			<configuration>
				<archive>
					<manifest>
					    <addClasspath>true</addClasspath>
						<mainClass>com.example.demo.DemoApplication</mainClass>
					</manifest>
				</archive>
			</configuration>
		</plugin>
	</plugins>
</build>
두 번째 오류의 내용은 다음과 같습니다.
Exception in thread "main" java.lang.NoClassDefFoundError: org/springframework/boot/SpringApplication
        at com.example.demo.DemoApplication.main(DemoApplication.java:10)
Caused by: java.lang.ClassNotFoundException: org.springframework.boot.SpringApplication
        at java.net.URLClassLoader.findClass(URLClassLoader.java:381)
        at java.lang.ClassLoader.loadClass(ClassLoader.java:424)
        at sun.misc.Launcher$AppClassLoader.loadClass(Launcher.java:331)
        at java.lang.ClassLoader.loadClass(ClassLoader.java:357)
        ... 1 more
이 오류의 원인은 파일명 입력 오류에 의한 경우가 대부분이라고 합니다. 하지만 아래 내용을 봤을 때 단순히 파일명 오류로 인한 것은 아닌 것 같아요.
저처럼 docker run 할 때 저런 오류가 발생하는 사례가 있었는지 찾아보았습니다.
아무래도 이전에 pom.xml을 수정해 입력했던 main class 부분에서 문제가 있는 것 같아 그 부분부터 다시 하였습니다.
no main manifest attribute, in /restful_springboot.jar
pom.xml에 추가한 내용
<build>
	<plugins>
		<plugin>
			<groupId>org.springframework.boot</groupId>
			<artifactId>spring-boot-maven-plugin</artifactId>
		</plugin>
	</plugins>
</build>
위의 내용 추가 후 package - docker build - docker run을 수행하면 다음처럼 출력됩니다.
PS C:\RESTful_MiniProject> docker run -p 5000:8080 restful_springboot

  .   ____          _            __ _ _
 /\\ / ___'_ __ _ _(_)_ __  __ _ \ \ \ \
( ( )\___ | '_ | '_| | '_ \/ _` | \ \ \ \
 \\/  ___)| |_)| | | | | || (_| |  ) ) ) )
  '  |____| .__|_| |_|_| |_\__, | / / / /
 =========|_|==============|___/=/_/_/_/
 :: Spring Boot ::                (v2.4.2)

...생략...

ple.demo.DemoApplication         : Started DemoApplication in
33.366 seconds (JVM running for 34.674)
성공적으로 실행되었습니다.
감사합니다.
Text by Chaelin. Photographs by Chaelin, Unsplash.